Energy Snack Loaf (sugar free)(gf)

I love this loaf for many reasons. It’s refined sugar free, getting it’s sweetness from bananas and dried fruit. It’s an excellent snack between meals when you need something to get you through. I always bring this with me when I travel (sliced and individually wrapped), it’s proven to be a lifesaver during long waits between meals, great to take on a hike. It tastes amazing and it’s healthy. Once you have all the ingredients, it comes together quickly –it’s such a cinch.

*sub in your favourite dried fruits and nuts to make it your own

Energy Snack Loaf

adapted from a recipe by https://theviewfromgreatisland.com/

Ingredients:

Dry – mix together:

1.5 cups almond flour

1/2 cup all-purpose gluten-free flour (or regular)

2 tbsp hemp hearts

1 tsp baking powder

1/2 tsp salt

Wet – in processor (can mix by hand):

2 bananas – liquified (or mashed well with potato masher)

2 large eggs

1/4 cup of olive oil (or oil of your choice)

1/2 tsp almond extract

1/2 tsp vanilla extract

Add ins – once everything is combined:

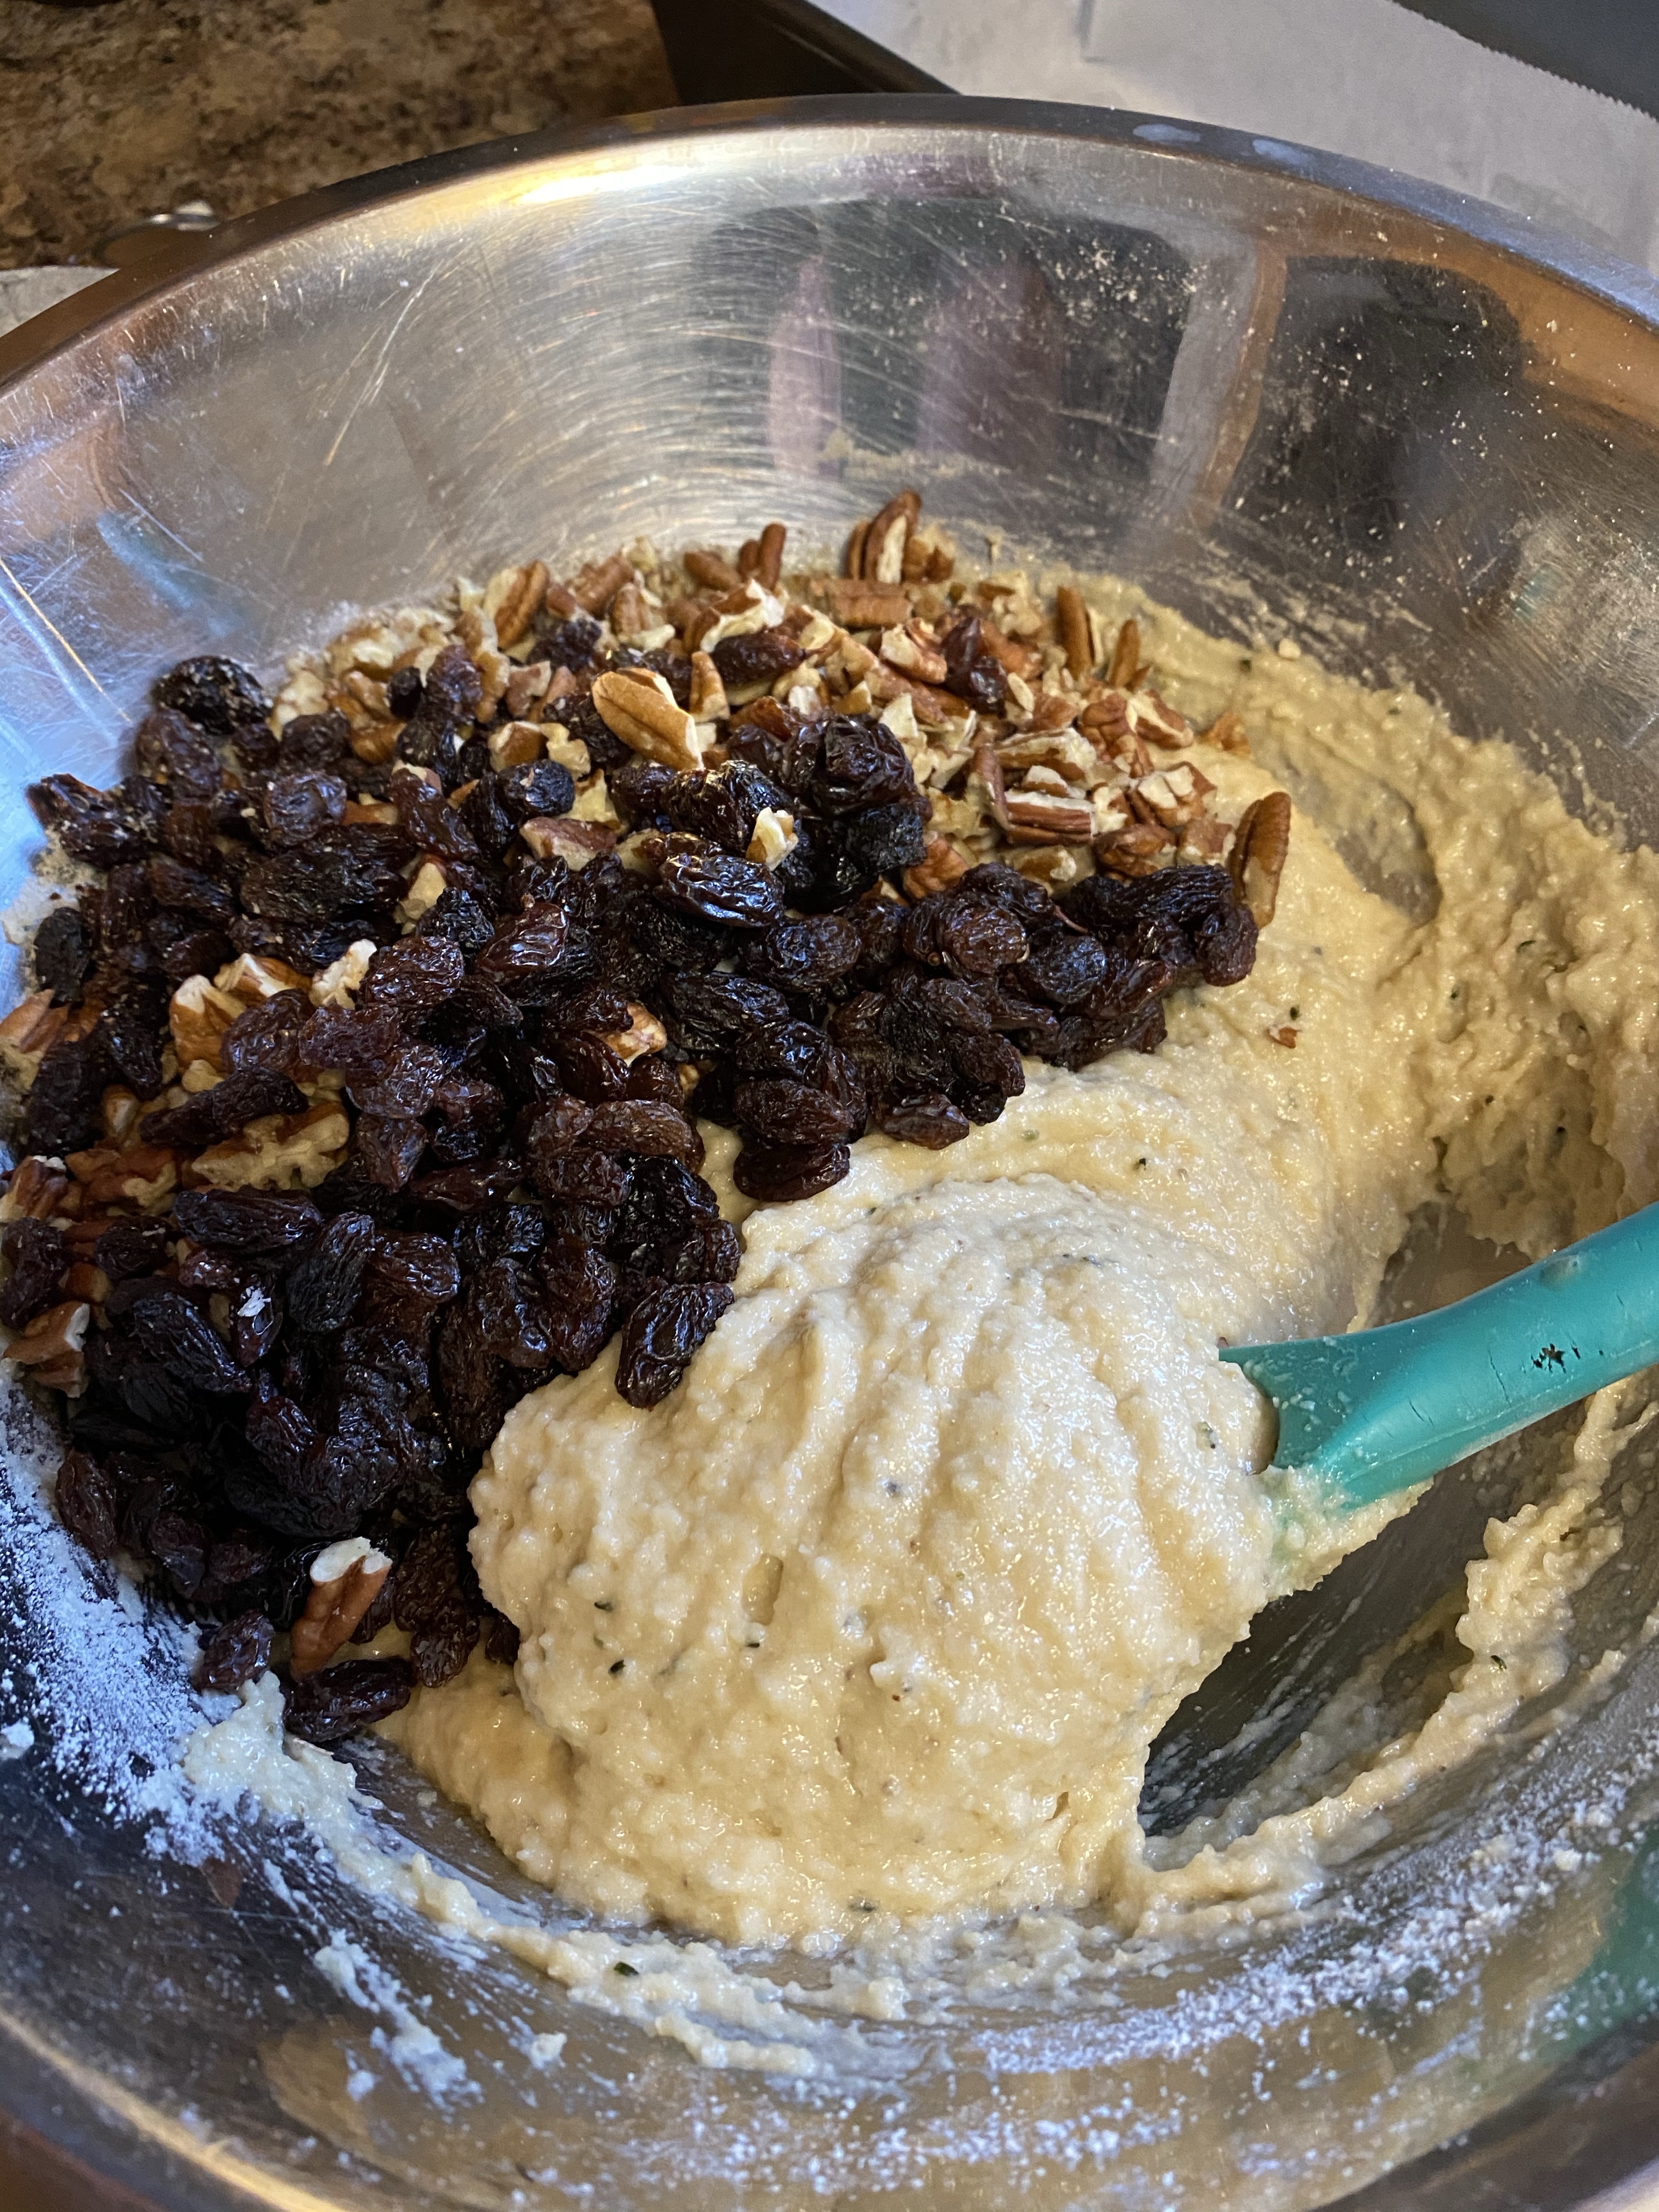
1 generous cup raisins or craisins (or dried fruit of choice)

1 generous cup pecans, roughly chopped (or nut of choice)

Directions:

Preheat oven to 350F. Line a 9 x 5 inch loaf pan with parchment paper. Set aside.

In large bowl, mix together the first 5 dry ingredients– almond flour, Gf flour, hemp hearts, baking powder and salt. Set aside.

In a food processor (or by hand) liquify the bananas, then add in the eggs and mix well. Add almond and vanilla extracts and olive oil and mix well.

Add the liquid ingredients to the dry ingredients and mix well. Fold in the raisins and nuts, until well combined.

Scrape into prepared pan, smoothing top. Bake for 40-45 minutes until tester comes out clean and top is golden brown.

Remove from pan and cool. Wrap in fresh parchment and chill in fridge. It’s easier to slice when it’s cold. Enjoy.

I store mine in the fridge but it’s not necessary to do so.

Add wet mixture into the dry mixture
Fold in fruit and nuts and mix thoroughly
Bake till golden brown and tester comes out clean

Low Carb Nut Bread (gf)

bread1_Fotor

I threw this together today and really loved it so I’m posting it so I don’t forget it–it’s a keeper! What’s great about this recipe is that there’s no sugar in it, there is a decent amount of protein from eggs and lots of healthy fats. It’s baked in a 9 inch square pan so it’s not in loaf form, but you can figure this out for a sandwich or just butter it and enjoy alone or with a meal.
*for vegans – you can try this with flax eggs and see how it goes, I haven’t tried that yet.

Ingredients:

Makes 16, 2 1/4 by 2 1/4 inch squares. Cut it up how you like.

Wet:
4 large eggs
3 tbsp olive oil (or coconut oil, avocado oil)
2 tsp cider vinegar (or lemon juice)
I large apple, peeled and grated
3 tbsp almond milk (or other nut milk)
Dry:
2 cups ground almond meal
1 cup ground pecans
3/4 cup shredded unsweetened coconut
3/4 tsp baking soda
1/2 tsp salt
1/2 tsp grated nutmeg

Instructions:

Preheat oven to 325F. Line a 9 inch square pan with parchment paper. Set aside.
Whisk eggs, olive oil, vinegar, almond milk until well blended, then stir in grated apple.
In separate bowl, mix almond meal, ground pecans, coconut, baking soda, salt and nutmeg.
Mix the wet into the dry ingredients until incorporated well. Pour/scrape it into pan. Bake 35-40 minutes until tester comes out clean. Cool, remove using parchment paper. Cut into squares once cooled, or into larger pieces as to your liking. Freezes well, wrapped individually.

Continue reading

Root Vegetable & Quinoa Rosti


img_8873_fotor

This is a really tasty recipe for this time of year, utilizing root vegetables.  It’s quite comforting with middle-eastern spices and works with your healthy diet plans. Feel free to  use what root veggies you have on hand – just be careful of your heat when cooking – the natural sugars can burn – so medium to medium-low heat and a sharp eye and nose is needed.

Root Vegetable & Quinoa Rosti

adapted from I Quit Sugar

Serves 4

Ingredients:

1 small onion, chopped finely

1 large clove of garlic, minced

2 medium carrots, peeled and grated

1 small sweet potato (or 1/2 large), peeled and grated

1 medium parsnip, peeled and grated

1/2 cup ground almonds or almond meal (sub in 1/2 cup more cooked quinoa if you don’t have any)

1 cup cooked quinoa

1/2 cup  gluten-free all-purpose flour (I’m using PC)

3/4 tsp salt

1/2 tsp ground pepper

1 tsp cinnamon

1/2 tsp ground cumin

2 tbsp tahini

1 tbsp curry paste (I used Patak’s mild yellow curry paste)

2 eggs

cooking oil of our choice (I use ghee)

Directions:

In a small frying pan, with a bit of cooking oil or ghee, saute onion on medium heat until somewhat browned, about 5-7 mins. Add garlic and stir around for one minute. Remove from heat.

Combine all the ingredients, including the onion/garlic mixture, and mix well, until all the flavours are well incorporated.

You can make them into large burger shapes, or like a rosti, as I’ve done here.

In a 10 inch cast iron or non-stick skillet, melt one tablespoon of ghee or cooking oil of your choice over medium heat. Tip mixture into pan and using a spatula, press down and go around edge and tuck it in and press it down and make it tidy.

Cook slowly – being careful of your heat, remember not to let it get too hot  – these veggies have lots of natural sugars and will burn. After about 10 minutes, place a plate over the rosti. Flip the pan over, and the rosti should now be on the plate. Place pan back on heat and put another tablespoon of cooking oil or ghee in your pan. Once melted, slide the rosti back into the pan so the other side can cook.  Cook for an additional 6-8 mins, being careful of your heat. Slide out onto plate.

Cut into wedges and serve with a chunky raita.  Here’s how I make mine:

Raita:

1 cup plain yogurt, 1/2 cup diced cucumber, 1/2 tsp salt, 1/2 tsp ground cumin, 1/4 cup chopped fresh cilantro.

img_8866_fotor_fotor

img_8868_fotor_fotor

img_8871_fotor_fotor


Homemade Hummus


IMG_8247

Homemade Hummus

Some simple ingredients are all you need to whip up this basic recipe for hummus.  You can adjust the flavour by adding more lemon juice, cumin, olive oil, smoked paprika…It’s delicious and healthy as a dip with veggies or pita, as a spread on a sandwich or wrap,  or even spread on a plate and topped with salad or curry.  Super versatile – don’t just think ‘dip’.

Hummus

adapted from the book Jerusualem

makes 4 cups

3 cups chickpeas (cooked or canned)

1 cup tahini

4 tbsp freshly squeezed lemon juice

4 cloves garlic

1 1/2 tsp salt

1/2 cup ice cold water

Method:

Drain chickpeas and place into food processor, blend until it forms a thick paste. Add tahini, lemon juice, garlic and salt. Continue to blend, scraping down sides until mixed. Pour ice water through feed tube while leaving the processor to run for 5 minutes. Let hummus rest for 30 minutes. Adjust seasoning to taste.

Will keep for approx. 4 days in fridge.

IMG_8245

Homemade Hummus

IMG_8246

Homemade Hummus

IMG_8252

IMG_8249

Red Onion Jam

onion jam on a cracker with old cheddar

onion jam on a cracker with old cheddar

This jam is totally my jam. 😉  It’s a fantastic condiment with a never-ending list of uses.  I love it on a piece of cheese on a cracker. On a grilled cheese? D-lish. This recipe requires a few exclusive ingredients,  but aside from that, it is very straight forward and easy.  I’m a big fan of kicking up the flavour of dishes with the use of great quality condiments.  Makes a great hostess gift with a chunk of cheese and some artisinal crackers.

Red Onion Jam

adapted from a recipe by Rachel Allen

Makes about 3 cups

Ingredients:

1/3 cup of unsalted butter

6 cups of diced onions (I used red but use whatever you like)

1.5 tsp salt

1.5 tsp freshly ground pepper

3/4 cup (real) maple syrup (or granulated sugar)

1/2 cup sherry vinegar (or balsamic)

1 cup red wine (leftover from the night before is fine, or even if it’s been sitting around a few days)

3 tbsp creme de cassis (a blackberry flavoured liquer)

Directions:

In a large heavy-bottomed saucepan over medium heat, melt butter. Add onions, salt, pepper and maple syrup (or sugar). Stir. Cover and let cook on medium-low heat, stirring every few minutes to avoid it sticking (add more butter if it starts to stick). Cook for approximately 30 – 45 minutes until onions are quite soft and cooked down.

Add the red wine, sherry vinegar and creme de cassis. Bring to a boil, then reduce to a simmer and continue to cook, uncovered, until it thickens and becomes ‘jammy’.  (anywhere from 30- 60 minutes. If using maple syrup, it will take longer as there is more liquid).  Pour into sterilized jars. Refrigerate when cool. Will keep for months, in sterilized jars – refrigerated.  Caution: addictive.

dice up onions

dice up onions

add to saucepan and cook down slowly

add to saucepan and cook down slowly

red wine, creme de cassis and sherry vinegar

red wine, creme de cassis and sherry vinegar

makes about 3 cups. Pour into sterilized jars.

makes about 3 cups. Pour into sterilized jars.

YUM

YUM

close up YUM

close up YUM