Cinnamon Buns


Here’s a very good standard cinnamon bun recipe with a yeasted enriched dough.  It’s easy once you get a feel for the dough. So read through all the instructions, and have a look at the pictures.  There are 2 rising stages so factor that in: 45 minutes each (at least).  So plan accordingly.  Undercooking these would be a sin so make sure you pay attention to what your buns are doing. They should be golden, risen and not gummy where they attach to other buns. Practice makes perfect, and this dough is  delight to work with so it’s fun to learn to be an expert Cinnamon Bun creator.

Makes one pan 9 x 13 of cinnamon buns,  9 large buns

This  cinnamon bun dough recipe is adapted from Food Swings by Jessica Seinfeld

Dough ingredientsSTEP ONE

1/2 cup butter

1 cup milk

4 1/2 cups all purpose flour

1/2 cup granulated sugar

1 tbsp quick-rise instant yeast

1 1/2 tsp salt

2 large eggs

Dough instructions:

Warm the milk and butter together in a small saucepan until the butter melts and the milk is lukewarm.  Pour into the bowl of your mixer. Mix together flour, sugar, salt, yeast in a bowl, and add that to your milk mixture. With dough hook attachment, mix  together until rough and combined, then add in eggs and continue to mix until a smooth dough forms.  Continue to mix for 3-5 minutes.

*you can mix this by hand in a large bowl — once your dough comes together, put on a floured surface and knead for 5-10 minutes.

Lightly grease a large bowl with oil , place dough in bowl and cover with a clean tea towel. Place in a warm place for about 45 minutes – 1 hour to rise until about doubled in size.  If you’re in Canada and it’s winter, a warm place can be hard to find, so I turn my oven on for a few minutes then turn it off, and rise my dough in the slightly warm oven. (so you aren’t waiting around forever).

STEP TWO

Cinnamon bun filling:

1/2 cup butter, melted

3/4 cup brown sugar

1 tbsp ground cinnamon

Mix together.

STEP THREE

When your dough has doubled in size,  pour it out onto a floured surface. Roll it out to a large rectangle about  1 cm thick. Treat it with care and not too intense.  Spread with filling. With long side towards you, roll up dough. Slice into equal width rolls — my log was 21 inches so I got 9 rolls about 2.5 inches wide.   Place rolls into greased 9 x 13 pan and cover with plastic wrap and allow to rise for about 45 minutes until doubled in size.  (You can at this point put them in the fridge, and bake in morning- increase baking time by about 5 minutes or so.)

Preheat oven to 375 F, bake for 20-25 minutes until golden.  Spread with glaze after cooling for a few minutes. (Glaze: 1 cup icing sugar, 2 tbsp milk, 1 tsp vanilla).

STEP FOUR

Serve and enjoy. Mange!


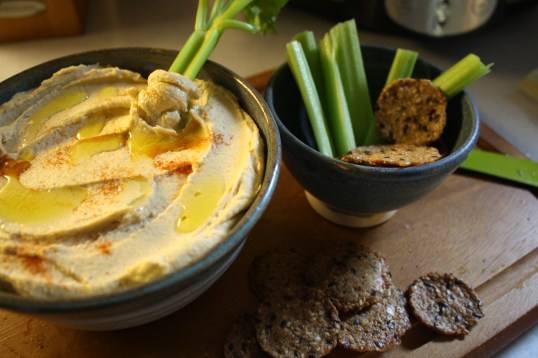
Homemade Hummus


IMG_8247

Homemade Hummus

Some simple ingredients are all you need to whip up this basic recipe for hummus.  You can adjust the flavour by adding more lemon juice, cumin, olive oil, smoked paprika…It’s delicious and healthy as a dip with veggies or pita, as a spread on a sandwich or wrap,  or even spread on a plate and topped with salad or curry.  Super versatile – don’t just think ‘dip’.

Hummus

adapted from the book Jerusualem

makes 4 cups

3 cups chickpeas (cooked or canned)

1 cup tahini

4 tbsp freshly squeezed lemon juice

4 cloves garlic

1 1/2 tsp salt

1/2 cup ice cold water

Method:

Drain chickpeas and place into food processor, blend until it forms a thick paste. Add tahini, lemon juice, garlic and salt. Continue to blend, scraping down sides until mixed. Pour ice water through feed tube while leaving the processor to run for 5 minutes. Let hummus rest for 30 minutes. Adjust seasoning to taste.

Will keep for approx. 4 days in fridge.

IMG_8245

Homemade Hummus

IMG_8246

Homemade Hummus

IMG_8252

IMG_8249

Healthy Nutty Balls

Heathy Nutty Balls

Heathy Nutty Balls


I’m a confirmed cookie addict and since cookies make me fat, I was thrilled when my friend, Marleen, made these nutty balls at a luncheon at her house.  Since then, I’ve been experimenting with the recipe ratios and making various flavours of nutty balls.  They are a delicious yet healthy snack (and gluten free), and even if you eat three of them a day, you won’t gain weight! I know this from experience.  Also, I love how I can eat this and not feel guilty–it’s got lots of omega-3’s and fibre.   So, play around with different types of nuts, flavourings  and coatings.  Try adding dried fruit and or cocoa.  I don’t stray from the maple syrup as a sweetener– I just think it’s so much healthier for you than sugar.  So. If you want or love a sweet treat after dinner or at midnight, make a batch of these and keep them in the freezer– they are best served very cold. Cheers. 🙂 Continue reading

Salami & Cheese in Puff Pastry

Salami and Cheese in Puff Pastry

This is an easy and delicious snack you can make in no time with a few ingredients. What can be better than that? We ate ours with soup, but I can see this as a party snack or as a midnight munchie.  Thaw out your puff pastry in the fridge overnight (which you purchase in the  freezer section).  The sky’s the limit when it comes to the filling – but using spicy salami with a mild cheese and some dijon was well received when I made it.  The puff pastry really puffs up, so it’s very visually appealing as well.  Give this a try,  it’s great. Continue reading

Rhubarb Cake with Cinnamon Crunch Topping

rhubarb cake with cinnamon crunch topping

I was wondering what to make with some fresh rhubarb from the farmer’s market…when I saw this recipe, I gave it a whirl. So good!  It’s a buttermilk batter and it’s just so creamy and delightful…with some rhubarby tartness and cinnamon crunch on top. A keeper. Easy too. Continue reading