Ginger-Soya Salmon Skewers

ginger soya salmon skewers with salad

This is a great way to make salmon now that we have our bbq’s fired up for the season. Make sure your grill is well greased — fish notoriously sticks and can turn into a mess. This marinade works well with salmon filets as well and you can cook them up in the oven (400F for 10-15 mins) all through the year. The marinade is super easy and can be made up ahead of time, then throw it on your fish to marinate an hour before cooking. The skewers cook up really quickly and served with a salad makes a healthy and satisfying dinner.  This recipe is delicious enough to serve to company and makes a great addition to your dinner repetoire.

* I served this with a big salad made with a variety of vegetables and a Creamy Japanese Dressing to tie the flavours together.

Salmon Skewers

1 1/2 pounds skinless salmon filet, sliced into  1/4 inch thick strips (against the grain)

1 Tbsp sesame seeds

8 wooden skewers, soaked in water for at least 15 minutes

Ginger-Soya Marinade

adapted from The Gourmet Prescription

3 Tbsp soya sauce or tamari (check label to verify gluten free if necessary)

1 1/2 Tbsp rice vinegar

1 tsp maple syrup

1 Tbsp lemon juice

1 tsp grated fresh ginger

Mix all ingredients. Place salmon strips in a non-reactive container and pour marinade over. Refrigerate for 1 hour.  Skewer salmon strips by weaving onto wooden skewers, about 2 strips per skewer.

Transfer marinade to a small saucepan, bring to a boil and simmer for 2 minutes.

Spray grill with Pam.  Heat BBQ to 400 F.   Place skewers on grill and cook for 3-4 minutes. Turn carefully. Sprinkle with sesame seeds. Cook for another minutes. Remove from grill.  Serve with heated marinade.

Everyone can spoon a tablespoon or so of the marinade over their salmon skewers.

skewers on the grill, sprinkled with sesame seedssalmon skewers with healthy salad with creamy japanese dressing

skewers on the grill, sprinkled with sesame seeds

salmon skewers with healthy salad with creamy japanese dressing

BBQ Beer-Can Chicken with Broasted Shallot Potatoes

beer can chicken and broasted potatoes

If you haven’t made a beer-can chicken yet, you might as well start. The result is a moist, delicious roast chicken — and it’s practically effortless. Plus, who doesn’t love roast chicken?  You can purchase your  beer-can chicken holder at a hardware store– they are widely available…or simply stick your chicken on a beer can (you can use any can with water in it and get the same result) and place on a metal pie plate.  The key is to have a great tasting “rub” to slather on your chicken, and to use your BBQ as a convection oven. Easy. Delish.

Beer Can Chicken

1 chicken

1 330ml can of beer (or a pop can half filled with water)

beer-can chicken holder or metal pie plate

3 Tbsp chicken rub (see recipe below)

2 Tbsp olive oil

Rub for Chicken

adapted from Anna Olsen,  foodnetwork.ca

2 Tbsp cumin seed

2 Tbsp coriander seed

1 tsp ground cinnamon

1 Tbsp ground oregano

1 Tbsp Hungarian sweet paprika

1 Tbsp smoked Spanish paprika

2 Tbsp salt

1 Tbsp fresh ground pepper

Turn  LEFT  side of BBQ on high. Remove upper shelf if you have one. Close lid and let heat up to 400 F.

Meanwhile, make rub. Dry roast cumin and coriander seeds in frying pan on medium heat until they begin to smell aromatic. Remove from heat and grind in a coffee grinder or use a mortar and pestle. (You can use ground cumin and coriander instead, if you want to skip this step — the roasting of the seeds gives it more intense flavour).  Mix all spices together. Place about 3 Tbsp. of the mixture in a medium sized bowl with 1-2 Tbsp of olive oil and stir.  Place your chicken in the bowl, and using your hands, slather the rub all over your chicken, being sure to get it in to all the crevices. Pour half of the beer out of the can. Place beer can into holder and slide chicken over.

*Save the rest of your leftover rub for the next time

place beer in holder

chicken on holder with rub slathered on

chicken on bbq, left side on, right side off

Place chicken and  holder onto the RIGHT side of your BBQ, breast facing the heat on left side. Close lid. Check chicken every 20 minutes or so, rotating each time. Maintain BBQ temp at approx 350-400F.  Once drippings begin to accumulate in the bottom of the holder, start to baste the chicken each time you check it. When the chicken reaches and internal temp of 165 F, remove from heat and let stand for at least 10 minutes before carving. Devour.

Broasted Shallot Potatoes

Slice up some potatoes, slice up some shallots (or onions). Place potatoes on squares of foil.  Fit shallots in between slices of potatoes. Top with olive oil, salt and pepper.  Wrap up foil packets securely, and place on the bbq beside your chicken. Cook until fork tender, approx 40 minutes or so.

potatoes with shallots, olive oil, salt and pepper

Pecan-Almond Granola

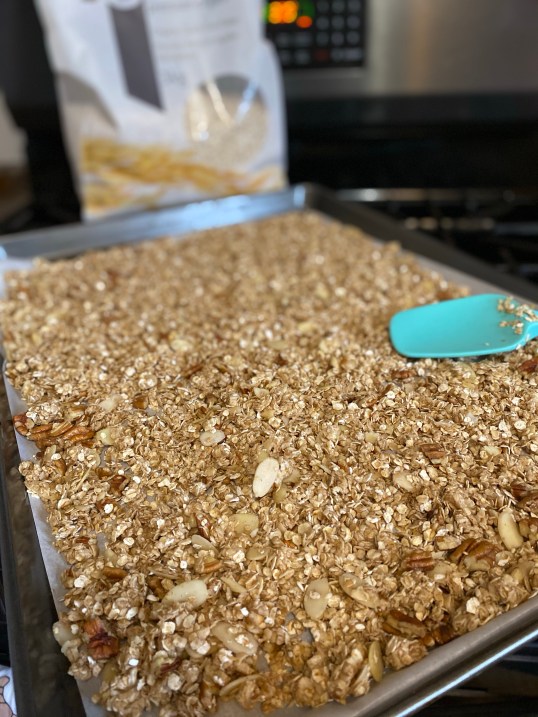
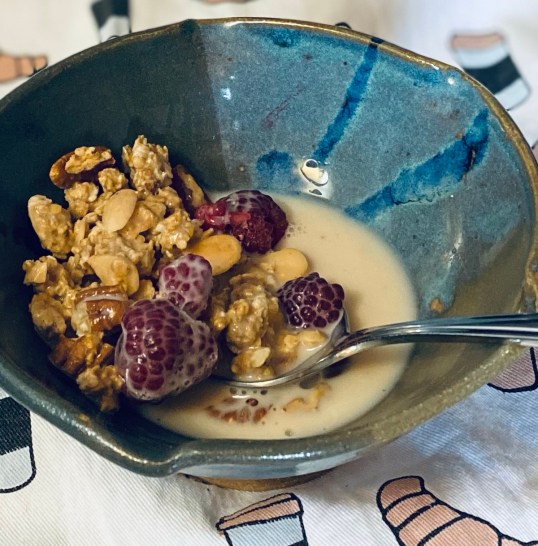
This granola is a staple in our house. I suppose that’s primarily because it’s so easy to make, but I also like knowing exactly what’s in my granola, and you cannot compare the cost to store-bought. The price of cereal, particularly a high-quality granola is one of the things that really bugs me! Sooo, I make this all the time. It’s also great if you have kids away at school – it mails perfectly in a ziploc bag, tucked into a parcel or a bubble envelope.  Give it a try – so tasty and easy. I eat about 1/4 of a cup of it with oat milk and fruit as part of my breakfast, or as a bedtime snack. LOVE IT.

Pecan Almond Granola

adapted from Cuisine at Home

3 cups large flake oats (preferably organic)

1 cup pecans, roughly chopped

1/2 cup sliced almonds

1/2 tsp salt

1 tsp cinnamon

1/2 cup coconut sugar (or brown sugar)

1/4 cup water

2 Tbsp coconut or avocado oil

2 tsp pure vanilla extract

1 tsp pure almond extract

Optional:

1 cup of dried fruit. (raisins, cranberries, etc.)

Preheat oven to 300 F.  Line a baking sheet with parchemnt paper.

In a large bowl, mix together oats, pecans, almonds, salt and cinnamon.

mix dry ingredients

In a small pot, heat water and brown sugar until sugar dissolves. Remove from heat. Add oil, vanilla and almond extract.  Pour over oat mixture.

pour liquid mixture over oats and toss thoroughly

Toss thoroughly, then spread onto baking sheet. Put in the oven for 15 minutes. After 15 minutes, stir around and spread out again. Put back in for another 5 minutes, then stir, turn again, and continue in this fashion until the granola feels dry to the touch.  Then turn off oven and leave the granola in there for another 1/2 hour to further dry out.

Take out of the oven, and let cool. If you are adding dried fruit, do that now. Place into an airtight container. Try it with milk or nut milk, yogurt, kefir, and add some fruit if you like.

Hearty Spring Salad

Hearty Spring Salad

I like this salad for dinner with some grilled fish or chicken. It’s extra filling because of the roasted asparagus and avocado. Putting it on a platter instead of a bowl is a nice way to present it. Toss your greens with dressing before putting on the platter, add your extras, then drizzle a little more dressing on top. The skies the limit here, it IS a salad after all.

Hearty Spring Salad

serves 4-5 as a main course with lean protein

5 cups mixed greens

1 pound roasted asparagus

1 avocado, sliced

2 tangerines, sectioned

3/4 cup grapes, sliced

1/2 cup shaved fresh parmesan

1/3 cup old-fashioned dressing (see recipe below)

Wash and dry mixed greens. Place in bowl. Prepare remaining ingredients. When ready to assemble, toss salad greens with salad dressing. Place on platter. Top with remaining ingredients as seen in photo. Drizzle with a tablespoon or more of dressing. Serve. Enjoy. 🙂

roasted asparagus

To roast asparagus:Preheat oven or bbq to 400.  Snap off ends. If asparagus is thick, peel stalks.  Place on a baking sheet and drizzle with a tablespoon of olive oil, salt and pepper. Roast for 8-10 minutes until tender. Cut into smaller pieces and add to salad.

Old-Fashioned Dressing

1/2 cup olive oil

1/4 cup white wine vinegar

1 clove garlic, minced

1 tsp honey

1/2 tsp salt

1/4 tsp ground black pepper

1 tbsp mayonaisse

Mix all ingredients together in jar and shake vigorously. Refrigerate remaining dressing.

Maple-Dijon Vinaigrette with Mixed Greens, Fruit and Cheese Salad

Maple dijon vinaigrette with Mixed Greens

Here’s what we eat for lunch and dinner practically every day, along with some lean protein. It’s a great everyday salad, everyone likes it and the dressing is well-loved by all, young and old. I’m listing my salad ingredients, but use what you have on hand, although I think our combination of ingredients is best. As well for the vinaigrette, follow the recipe, but feel free to substitute whatever vinegar you have on hand. I use rice vinegar, sherry vinegar, white balsamic, red balsamic, red wine vinegar. The maple syrup (or add sugar or honey if you don’t have real maple syrup on hand) adds just enough sweetness to balance the vinegar. This will be your new standard, so you might as well learn it by heart. I keep mine on the counter in a glass jar — good for 5 days or so on the counter (providing it isn’t too hot in your kitchen)– feel free to refrigerate if you aren’t using it daily.

Maple-Dijon Vinaigrette

1 cup extra virgin olive oil

1/2 cup vinegar of your choice

2 tsp dijon mustard

2 tsp real maple syrup

1 tsp salt

1/2 tsp freshly ground pepper

Mixed Salad

(Serves 4)

6 cups mixed greens (preferably organic)

1/2 cup red grapes, sliced in half

1 tangerine, sectioned

1/3 cup diced feta cheese

2 tbsp. toasted slivered almonds

shavings of fresh parmesan

Vinaigrette:

In a jar with secure lid, add all ingredients. Shake well. Shake again before dressing salad. For the above amount of salad, I use approx. 1/4 cup of dressing.

Salad:

Wash and spin your greens, even if it says they are pre-washed. Add the rest of the ingredients, except almonds and parmesan. Toss. Top with almonds and parmesan. Bon Apetit. Goes great with chicken, fish, burgers…everything. 🙂

everyday salad